Using Squid, Apache and Python To Develop a Captive Portal Solution
You can also read this article from my LinkedIn from this URL https://www.linkedin.com/pulse/using-squid-apache-python-develop-captive-portal-solution-peter-emil
When I was a student in high school, I was always fascinated with captive portals. It always felt like a super-secret powerful thing to redirect someone’s traffic to a website of my choice. Despite having this weird fascination, I never knew that this was called a captive portal until I went to my network security internship.
When I was a student in high school, I was always fascinated with captive portals. It always felt like a super-secret powerful thing to redirect someone’s traffic to a website of my choice. Despite having this weird fascination, I never knew that this was called a captive portal until I went to my network security internship.
During my internship,
I was introduced to lots of concepts but never really learnt how to combine the
ones I need to produce something like a captive portal page.
Before we
dive into this article you must first
- Have squid installed and configured as a transparent proxy. There are lots of guides on the internet that will instruct you on how to complete this step.
- Have Apache (or similar) installed and configured to use CGI (in our case, for a python script).
- [OPTIONAL] Have a local DNS server installed that we will use to create a domain name for our captive portal. In my case, I preferred the Windows Server 2016 DNS just because I already had windows server installed.
- [OPTIONAL] If you have a local DNS server, you must set up your DHCP configuration to use that server.
Please bear
in mind that this article is not intended to be a how to step by step guide, it
will only explain the main concept and some commands. It will also tell you
what you need to search for to develop something like this.
Squid ACLs
Squid Access
Control Lists have always been a powerful tool to control who gets access to
what. We can allow access, deny access, or deny access and redirect to a certain
page.
Let’s first
grasp the main concept. We are going to introduce two Squid ACLs. We’ll call
the first one AllowCaptive and the second one CaptiveHosts. AllowCaptive will
contain captive.local as a destination domain. We will allow all hosts to access
AllowCaptive since the captive portal webpage should be accessible by everyone.
As for
CaptiveHosts, let’s assume that CaptiveHosts will contain all these hosts that
did NOT authenticate with the captive portal yet. We want to allow these hosts
to access AllowCaptive but deny them everything else. We will also show them
the captive portal, as the deny info page using these 3 commands.
http_access
allow CaptiveHosts AllowCaptive
deny_info
http://captive.local/?original=%u CaptiveHosts
http_access
deny CaptiveHosts
- The first command allows CaptiveHosts to access the portal page.
- The second command defines the redirection page http://captive.local (where the portal is located). We will give this HTTP request an extra argument called original. We will set the value of original to the URL the user was trying to visit before getting redirected. Later on, we will use this argument to automatically redirect the user to whatever s/he was doing before being forced to access the portal page.
-
The third command denies access to everything else for unauthenticated users.
Squid helpers and External ACLs
Squid has
this very neat feature (that you can read more about online) called external
ACLs.
Here is how
I like to think of it. You tell Squid to create an ACL, but you inform squid
that you won’t tell it who’s a member of this ACL. Instead you tell it: when
you want to know if someone is a member of this ACL go ask this helper program and
it will tell you whether this host is part of the ACL or not.
The idea is
that when squid queries our helper program asking, is this host part of
CaptiveHosts or not? Our program will check whether the host authenticated or
not? If the host did not authenticate then it tells squid that this host is
part of CaptiveHosts, therefore squid redirects this host to the captive
portal.
If the host
did indeed authenticate, the program tells squid that this host is not a member
of CaptiveHosts so squid does no redirection. We tell squid to make use of our
helper program using these 2 commands.
external_acl_type
myhelper ttl=5 %ACL %SRC %DST %PROTO /etc/squid/warning/warning.py
acl
CaptiveHosts external myhelper
- The first command tells squid how to use this program. It gives it a name “myhelper”. By default, squid caches the reply your program gives -for a certain host- for 1 hour which isn’t very useful in our case, so we will set this down to 5 seconds. Squid will invoke this program and pass arguments via STDIN and get the result via STDOUT. We tell squid what arguments to pass. You can check all available arguments online. Finally, we give it the path of our program. This python program must indicate the interpreter it wishes to use by putting this as the first line (uses python3.5)#!/usr/bin/env python3.5The script must also be executable, you can set this using chmod +x filename
- The second command tells squid to use that program in our CaptiveHosts ACL.
Knowing whether the user authenticated or not
Feel free to
build your system as you please. In my case, the user only had to view the
terms and conditions page and click accept. When the user clicked accept, he
was redirected to another webpage. When the user visits this webpage, his IP
address (or in my case MAC) will be recorded in a file. This was accomplished
by the means of another python script that can be invoked from apache or run by
itself. The MAC was retrieved quickly using ntopng network monitor (DPI, you
can read more about ntop online). Now when the user attempts to access another
webpage, squid will query the helper program and it will check the file and conclude
that s/he authenticated. Thus, it will tell squid that this host is not part of
CaptiveHosts and therefore, the user will not get redirected.
The user is
now free to access the internet.
BONUS: Redirecting the user back to what s/he was doing
In my case,
I wanted to let my users get redirected to whatever they were doing before they
got forced to access the portal page. This was accomplished by setting an
argument while redirecting to the portal page called “original”.
When the
user loaded the portal page, apache invoked a python script that read this
argument, loaded the HTML file internally, placed the original link as an
“original” argument to the href HTTP link of the accept button. It then sent
the final HTML file to apache to be sent to the user. When the user pressed
accept, Apache invoked the python script that records the user’s IP address (or
MAC in my case). This script will also check if there is an “original” argument
in the HTTP request. If the script found this argument it will add a meta
refresh HTML element and will set its URL attribute to the user’s original
destination which will redirect him/her appropriately. This makes the captive
portal solution a lot more convenient.
Data Flow
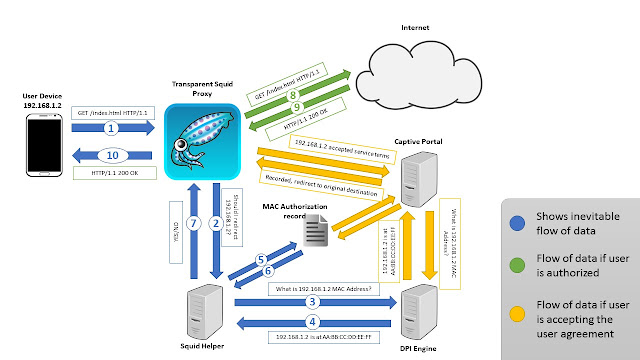
The
following diagram represents the data flow in my case. It serves to summarise
the contents of this article in a visual manner.
 |
| Image By Peter Emil |
Other Considerations
Since a
squid transparent proxy does not proxy HTTPS traffic by default, the user will
be able to bypass the portal by accessing HTTPS sites. This problem can be
solved by placing a default IPtables firewall rule to deny everyone access to
the internet, and then when a user authenticates, the script that apache calls,
adds an iptables firewall rule to allow that specific host to access the
internet. On the other hand, Squid can be configured to bump SSL traffic and
force the user to access the portal page (search for squid ssl bumping)
Conclusion
This
solution not only solves the problem, but it also allows for considerable
flexibility and allows us to develop our solution EXACTLY the way we want it.
Squid is a very powerful tool and I believe that if used correctly, can be used
to accomplish almost everything.
I hope you
liked this article and make sure you follow me to get all my latest articles.


Dude, you are awesome!
ReplyDeleteKeep this up.
Thank you TariQ ^_^ ^_^
DeleteAmazing experience on reading your article. It is really nice and informative.
ReplyDeletePython Training in Chennai
Python Classes in Chennai
JAVA Training in Chennai
Hadoop Training in Chennai
Selenium Training in Chennai
Python Training in Chennai
Python Course in Chennai
You provide the concept is very different and useful. Thank you for sharing with us and continuing the great blogging.
ReplyDeleteUnix Training in Chennai
Unix shell scripting Training in Chennai
Excel Training in Chennai
Corporate Training in Chennai
Oracle Training in Chennai
Oracle DBA Training in Chennai
Pega Training in Chennai
Unix Training in Chennai
Unix shell scripting Training in Chennai
This comment has been removed by the author.
ReplyDeletevery nice blogs!!! i have to learning for lot of information for this sites...Sharing for wonderful information.Thanks for sharing this valuable information to our vision. You have posted a trust worthy blog keep sharing.
ReplyDeleteWeb Designing Course Training in Chennai | Web Designing Course Training in annanagar | Web Designing Course Training in omr | Web Designing Course Training in porur | Web Designing Course Training in tambaram | Web Designing Course Training in velachery
perde modelleri
ReplyDeletesms onay
mobil ödeme bozdurma
nft nasıl alınır
ankara evden eve nakliyat
trafik sigortası
dedektör
Website.kurma
aşk kitapları
Smm panel
ReplyDeletesmm panel
iş ilanları
instagram takipçi satın al
hirdavatciburada.com
Https://www.beyazesyateknikservisi.com.tr/
Servis
Tiktok jeton hile